How to use LIgO for receptor-level simulation
Simulation of a TCR dataset containing two immune signals
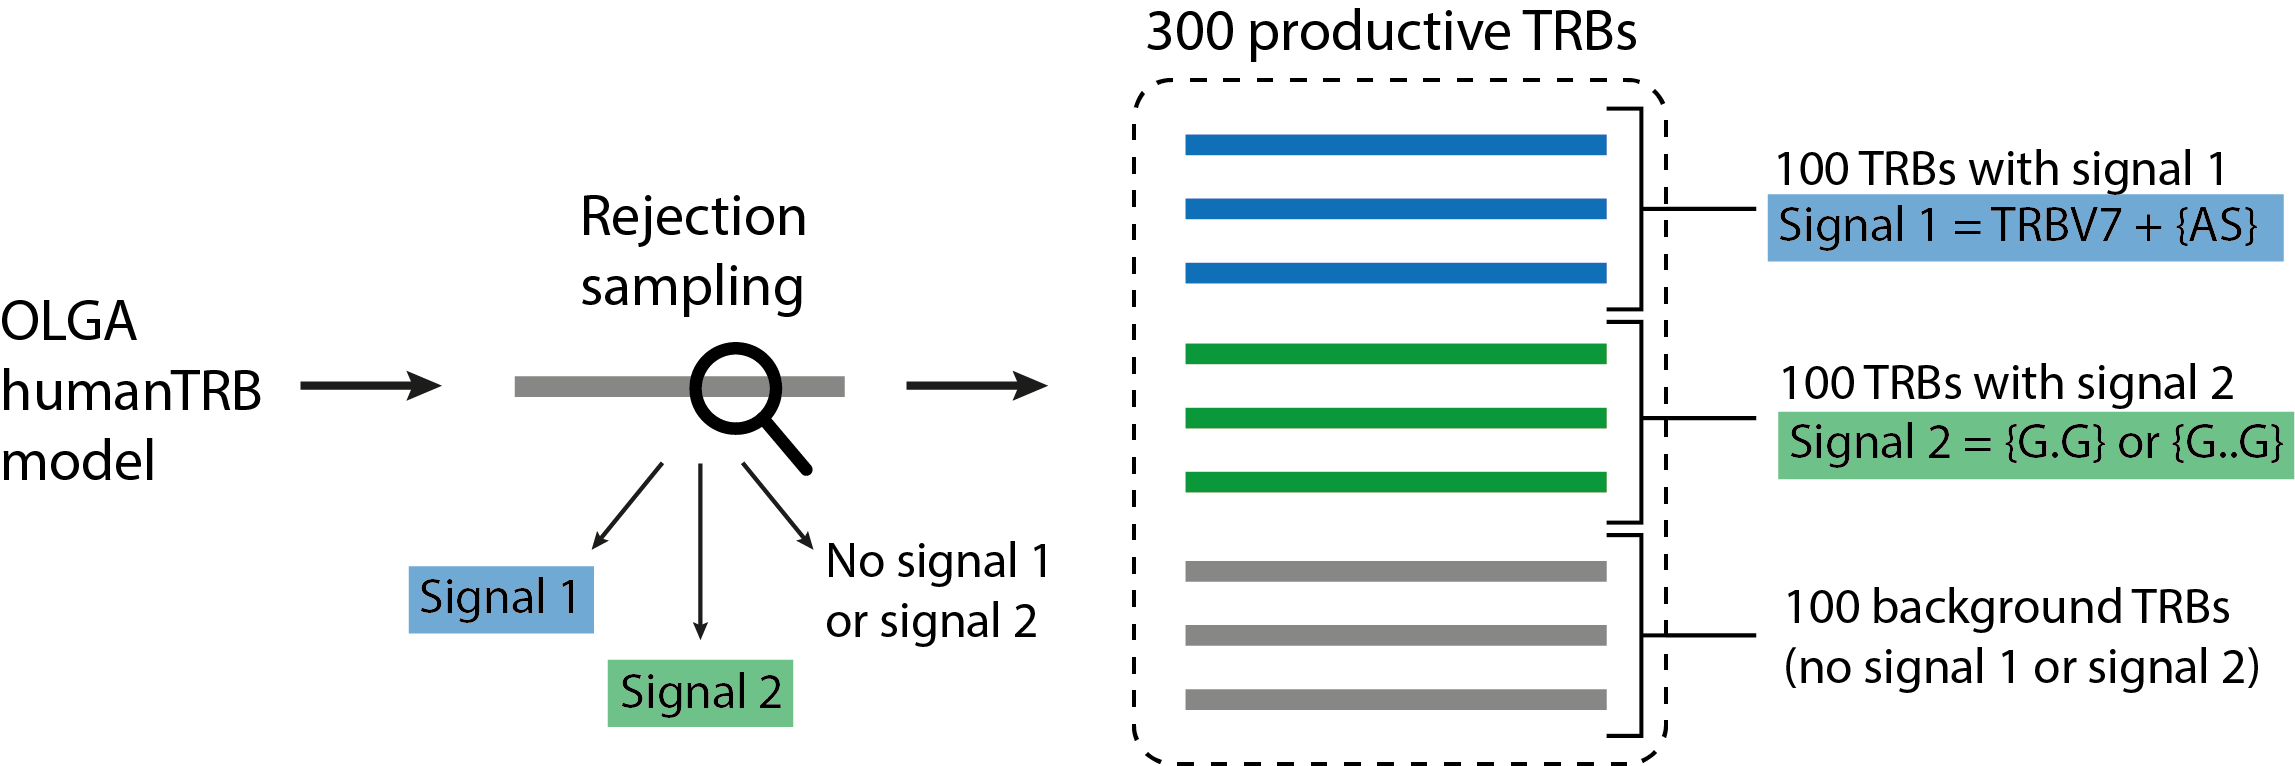
In this quickstart tutorial, we will simulate a dataset of 300 productive TRB receptors such that (see the illustration below):
100 TRBs containing signal 1;
100 TRBs containing signal 2;
100 TRBs containing no immune signal (background receptors).
We define signal 1 and signal 2 as the following (see the illustration below):
Signal 1 consists of a 2-mer {AS} and TRBV7, i.e., only TRBs containing both TRBV7 and 2-mer {AS} contain Signal 1;
Signal 2 consists of two gapped k-mers {G.G} and {G..G}, i.e., only TRBs containing {G.G} or {G..G} contain Signal 2.
Signal-specific TRBs will be generated using the rejection sampling strategy and the default OLGA model (humanTRB).

By default, LIgO reports the simulated TRBs as a triple of the TRBV gene name, CDR3 AA sequence, and TRBJ gene name. To add full-length TCRs to the output, it is necessary to download the Stitchr reference data using stitchrdl -s human, see Stitcher documentation for more information. Once the Stitchr reference data is downloaded, LigO will automatically add full-length TCR sequences to the output.
If you also want to report the generation probabilities (pgen) of the simulated receptors according to the default OLGA humanTRB model, set the export_p_gens parameter to true. Please keep in mind that pgen evaluation may take time.
Step 1: YAML specification
We need to define the YAML file describing the simulation parameters. First, we define the immune signals 1 and 2 in the definitions section. You can read more about the yaml file parameters in YAML specification.
definitions:
  motifs:
    motif1:
      seed: AS
    motif2:
      seed: G/G
      max_gap: 2
      min_gap: 1
  signals:
    signal1:
      v_call: TRBV7
      motifs: [motif1]
    signal2:
      motifs: [motif2]
Second, we define the number of TRBs per signal in the simulations section. You can read more about the yaml file parameters in YAML specification.
simulations:
  sim1:
    is_repertoire: false
    paired: false
    sequence_type: amino_acid
    simulation_strategy: RejectionSampling
    remove_seqs_with_signals: true # remove signal-specific AIRs from the background
    sim_items:
      sim_item1: # group of AIRs with the same parameters
        generative_model:
          chain: beta
          default_model_name: humanTRB
          model_path: null
          type: OLGA
        number_of_examples: 100
        signals:
          signal1: 1
      sim_item2:
        generative_model:
          chain: beta
          default_model_name: humanTRB
          model_path: null
          type: OLGA
        number_of_examples: 100
        signals:
          signal2: 1
      sim_item3:
        generative_model:
          chain: beta
          default_model_name: humanTRB
          model_path: null
          type: OLGA
        number_of_examples: 100
        signals: {} # no signal
Finally, we define the technical parameters of the simulation in the instructions section. You can read more about the yaml file parameters in specification.
instructions:
  my_sim_inst:
    export_p_gens: false
    max_iterations: 100
    number_of_processes: 4
    sequence_batch_size: 1000
    simulation: sim1
    type: LigoSim
Here is the complete YAML specification for the simulation:
definitions:
  motifs:
    motif1:
      seed: AS
    motif2:
      seed: G/G
      max_gap: 2
      min_gap: 1
  signals:
    signal1:
      v_call: TRBV7
      motifs: [motif1]
    signal2:
      motifs: [motif2]
  simulations:
    sim1:
      is_repertoire: false
      paired: false
      sequence_type: amino_acid
      simulation_strategy: RejectionSampling
      remove_seqs_with_signals: true # remove signal-specific AIRs from the background
      sim_items:
        sim_item1: # group of AIRs with the same parameters
          generative_model:
            chain: beta
            default_model_name: humanTRB
            model_path: null
            type: OLGA
          number_of_examples: 100
          signals:
            signal1: 1
        sim_item2:
          generative_model:
            chain: beta
            default_model_name: humanTRB
            model_path: null
            type: OLGA
          number_of_examples: 100
          signals:
            signal2: 1
        sim_item3:
          generative_model:
            chain: beta
            default_model_name: humanTRB
            model_path: null
            type: OLGA
          number_of_examples: 100
          signals: {} # no signal
instructions:
  my_sim_inst:
    export_p_gens: false
    max_iterations: 100
    number_of_processes: 4
    sequence_batch_size: 1000
    simulation: sim1
    type: LigoSim
Step 2: Running LIgO
After saving the yaml specification to a file (e.g., quickstart_receptor.yaml), you can proceed with the analysis by following these steps:
Activate the virtual environment where you have installed LIgO, for example
source ligo_env/bin/activate
Navigate to the directory where the yaml specification (quickstart_receptor.yaml) was saved.
Execute the following command:
ligo quickstart_receptor.yaml quickstart_output_receptor
All results will be located in quickstart_output_receptor. Note that the output folder (quickstart_output_receptor) should not exist prior to the run.
Step 3: Understanding the output
The simulated dataset is located under
quickstart_output_receptor/my_sim_inst/exported_dataset/airr/batch1.tsv.
In the output, each row represents one AIR. Some of the output columns are shown in the table below.
v_call: V gene of a simulated AIR
j_call: J gene of a simulated AIR
junction_aa: junction of a simulated AIR
signal1: 1 if a simulated AIR contains
signal1; 0 otherwisesignal2: 1 if a simulated AIR contains
signal2; 0 otherwisesignal1_position: binary mask representing position of
signal1in a simulated AIRsignal2_position: binary mask representing position of
signal2in a simulated AIR
v_call |
j_call |
junction_aa |
signal1 |
signal2 |
signal1_position |
signal2_position |
|---|---|---|---|---|---|---|
TRBV10-1*01 |
TRBJ2-5*01 |
CARPDRGGGYTF |
0 |
1 |
m000000000000 |
m000000100000 |
TRBV7-2*02 |
TRBJ2-5*01 |
CASSRGHFQETQYF |
1 |
0 |
m01000000000000 |
m00000000000000 |
TRBV7-8*01 |
TRBJ2-3*01 |
CASSSPGGVRIYSTDTQYF |
1 |
0 |
m0100000000000000000 |
m0000000000000000000 |
… |
… |
… |
… |
… |
… |
… |
Next steps
For a quickstart guide on repertoire-level simulation see How to use LIgO for repertoire-level simulation.
Other tutorials for how to use LIgO can be found under Tutorials.
You can find more information about yaml parameters in YAML specification.